 Blogmund
A few months ago I was tasked with setting up end to end testing on my client's website for the first time.
Initial reaction: Oh no, you think too highly of me... What is this Cucumber you speak of?
Me now: Cool as a cucumber 🥒
- So what is Playwright and Cucumber?
- Playwright
- Cucumber
- Common question about E2E Testing
- Why Cucumber?
- Installation Steps
- cucumber.json Setup
- settings.json
- World File Setup
- Setup of Steps File
- Setup of Features File
- Reusable Steps and Dynamic Values
- Environment Variables
- Running the Test
- Generate Report and Custom Report UI
- FYI: Good A11y = Good Time
- References
- Extensions to Install
So what is Playwright and Cucumber?
Enter stage right: Playwright

Playwright is an open-source test automation library developed by Microsoft. It allows developers to write scripts that can automate browser interactions for testing purposes.
This is useful for automating reptitive tasks the tester or QA would have to perform manually, which can save a lot of time if your website has a lot of features.
It's also good for regression testing, ensuring that new changes don't break existing functionality. Where having this set up as part of your build process can catch issues early.
Enter stage right: Cucumber

Cucumber is a testing framework that supports Behavior-Driven Development (BDD). It allows you to write test scenarios in plain language (Gherkin syntax), making it easier for non-technical stakeholders to understand and contribute to the testing process.
When this is combined with Playwright, you (or hopefully the person on the team writing the test cases) are able to write human readable tests in the Gherkin syntax. Following the Given, When, Then format.
By having the test cases written this way you can put the test cases written as is (with minor editing) into the project, and write reusable test steps. It really is that simple, you'll see in a bit.
Common quesiton I get after mentioning End to End Testing
"Aw yeah, so its basically unit testing?"
No no no. Unlike unit testing where we're trying to write tests to break our isolated piece of code. End to end testing is writing tests that emulate the user experience on the website or it's features.
For example, the experience of filling out an account registration form or making a purchase.
Why Cucumber?
Why use Cucumber for BDD as opposed to other options out there? It's the most popular choice, therefore support and documentation are reliable and up to date. However, there are a lot things I wish I knew when I started and would do differently, so hopefully this article adds to the documentation ecosystem for Playwright and Cucumber 😀
"Why is it called Cucumber?"
(Answering for a coworker who asked me this): According to the official Cucumber site, the author's fiance thought it would be a catchy name.
🚨 Here's the repo link to follow along with the guide: Playwright Dev Blog
Installation Steps
Install Playwright
npm init playwright@latestCopied!
Install Cucumber
Once finished selecting the prompts for the above, install cucumber as dev dependency:
npm i --save-dev @cucumber/cucumberCopied!
Install ts-node and types
Install ts-node and types/node as dev dependencies:
npm i --save-dev ts-node @types/nodeCopied!
cucumber.json Setup
Copy this snippet into cucumber.json (create the file in root dir):
{
  "default": {
    "paths": [
      "tests/features/"
    ],
     "requireModule": [
      "ts-node/register"
    ],
    "require": [
      "tests/steps/**/*.ts",
      "tests/steps/**/*.tsx",
      "support/**/*.ts"
    ],
    "formatOptions": {
      "snippetInterface": "async-await"
    },
    "format": [
      [
        "html",
        "report/cucumber-report.html"
      ],
      "summary",
      "progress-bar",
      "json:./report/cucumber-report.json"
    ]
  }
}
Copied!
Important to note
- The
pathskey is where the cucumber features will live. These are test scenarios. - The
requirekey is where your test steps live. These are the steps called by the feature files in thepathsvalue. - You can set the path of your
formatvalue for the cucumber-report json and html where you want on your project. The report directory is the appropriate home for it. And this will be important later, as our report plugin will need the same dir to access the results.
Given this info, create features, steps, and pages dirs under test dir.
The pages dir is to solidify our Page Object model approach by simplifying and isolating the variables and actions related to each page on our site.
settings.json
Create dir for local vscode settings.json file and add this:
{
    "editor.quickSuggestions": {
        "other": "on",
        "comments": "off",
        "strings": "on"
    },
    "cucumberautocomplete.steps": [
        "tests/steps/*.ts",
        "tests/steps/*.tsx",
        "support/*.ts"
    ],
    "cucumberautocomplete.syncfeatures": "tests/features/*.feature",
    "cucumberautocomplete.strictGherkinCompletion": true,
}
Copied!
This should work with the Cucumber (Gherkin) Full Support extension for proper autocomplete and step definition in feature files.
World File Setup
Before we write our steps, features, and page object files we should set up our cucumber world object.
The world object is the state management, it holds the context for that test scenario's variables and data between each step. For example with maintaining the logged in state for your test scenario.
Setting this up correctly can be crucial in making sure we're prepared for test cases where we might open another tab in the test.
Not that the project this is testing requires a complex test, that's keeping track of multiple pages. But it would have helped me in the past, and hopefully this can help someone else who runs into a similar situation.
Page Object
Set up of the page object (of type Page from '@playwright/test') is done in here for clean reference in test steps files.
Hooks
To save repetitive code and by personalising your testing experience with additional functions per test: you can use Cucumber's Before and After hooks.
In this project I have set up the hooks in the world.ts file. You can technically home these in their own hooks.ts file, or literally anywhere as Cucumber finds and calls these hooks at compile time (like how feature files work).
I keep mine in the world.ts file as its the pattern I'm familiar working with.
Benefits of the Before and After hooks are:
- Manually starting and closing your sessions per scenario
- Call custom console.logs and other functions when tests start, finish or even fail.
Setup of Steps File
The Steps in Cucumber are responsible for the actions you intend to make for each scenario in the Features file.
The tests/steps dir you made earlier is where your steps files will live.
Step file name example:
example.step.tsCopied!
Setup of Features File
The Features file in Cucumber is responsible for the human readable test scenarios and their steps. The Gherkin syntax makes it easy for non technical team members to help write tests.
The tests/features dir you made earlier is where your feature files will live.
Feature file name example:
example.featureCopied!
Reusable Steps and Dynamic Values in Tests
You might be confused coming from a web dev background how the steps and features work together:
Reusable Steps
A benefit of Cucumber is not only are the test steps human readable but can be reused across other feature files, as Cucumber fetches the steps and features at compile time.
For example you can write a test step to navigate/goto to a particular page of your site just once across all your tests. And then refer to it from any of your feature files regardless where its stored in your steps file.
Although it is recommended to put these global steps in a global steps file for cleanliness.
e.g. see the tests\steps\Shared.step.ts file and its usage in both tests\features\Home.feature and tests\features\Navigation.feature
Dynamic Values Using Cucumber Expressions
Cucumber expressions are a handy way to call a test multiple times without writing different variations of that same test.
For example you can write a test in your steps file to find a heading on a page like this:
Then("the page should have the heading {string}", async (headingText) => {
    await expect(page.getByRole('heading', { name: "headingText" })).toBeVisible();
});
Copied!
And then pass in a different value for the string you're looking for in the feature file like this:
Then the page should have the heading "About"Copied!
I have found this especially handy for actions (When tests), when you want to test what happens when entering different inputs into a form for form validation testing. e.g. Happy Case, Sad Case, Edge Case.
String isn't the only parameter type you can use, you can use word (matches words with no whitespace), int, float, and more.
Environment Variables
Quick walkthrough for setting up .env on your project to test on different environments. Comes in handy when setting up your build pipeline to work with different env variables.
Install .env
npm i --save-dev dotenvCopied!
I have kept my .env file very simple containing two variables like this:
# Local development
ENV=development
BASE_URL=http://localhost:3000


# Production
# ENV=production
# BASE_URL=https://google.com
Copied!
Set up with Cucumber
You might have noticed when you install a vanilla Playwright setup you are provided with a playwright.config.ts file which has .env setup commented out.
For those of us that walk the path of the mighty Cuke we have some additional setup as we're running Cucumber not Playwright to run our tests (remember adding this?).
In your cucumber.json add this dir to the top of your "require" array:
"support/env.ts",Copied!
Next create that file in your support dir (where your world.ts file lives), and add the following:
import dotenv from 'dotenv';
import path from 'path';
dotenv.config({ path: path.resolve(__dirname, '../.env') });
Copied!
And now in our Given step we can refer to the url of our current environment with this import:
const base = process.env.BASE_URL;Copied!
Feel free to look at the tests/steps/Shared.step.ts for the full implementation. But thats our .env setup, done!
Running the Test
Use tag at top of feature file and refer to that tag in your script thats called from package.json.
For example:
"home": "npx cucumber-js --tags @home"Copied!
Run using:
npm run homeCopied!
Generate Report and Custom Report UI
Generating Report
Currently, in order to open your report you would have to open the cucumber-report.html file that's generated each time you run a test command. Either manually or through a custom script in your package.json.
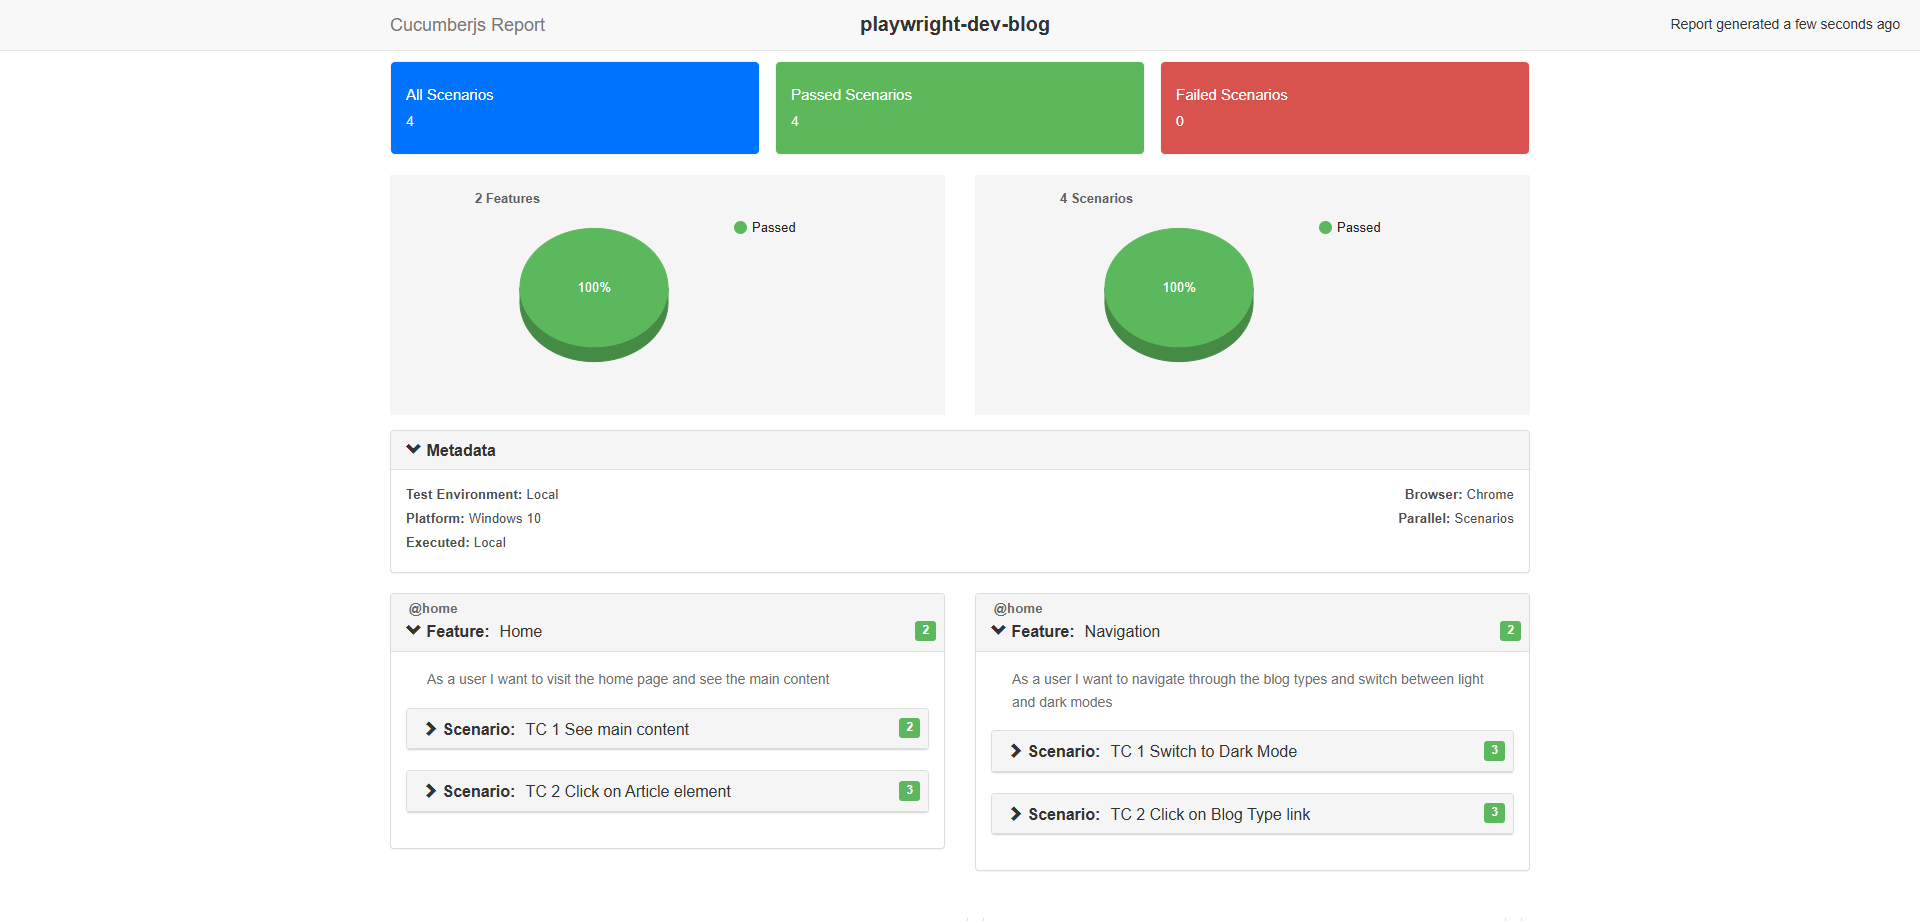
This is currently configured in our cucumber.json file to create a cucumber-report.html and cucumber-report.json report files upon each test.
It is recommended upon installing cucumber via npm to also install cucumber-html-reporter according to online documentation if you want a prettier format.
Custom Report UI Benefits
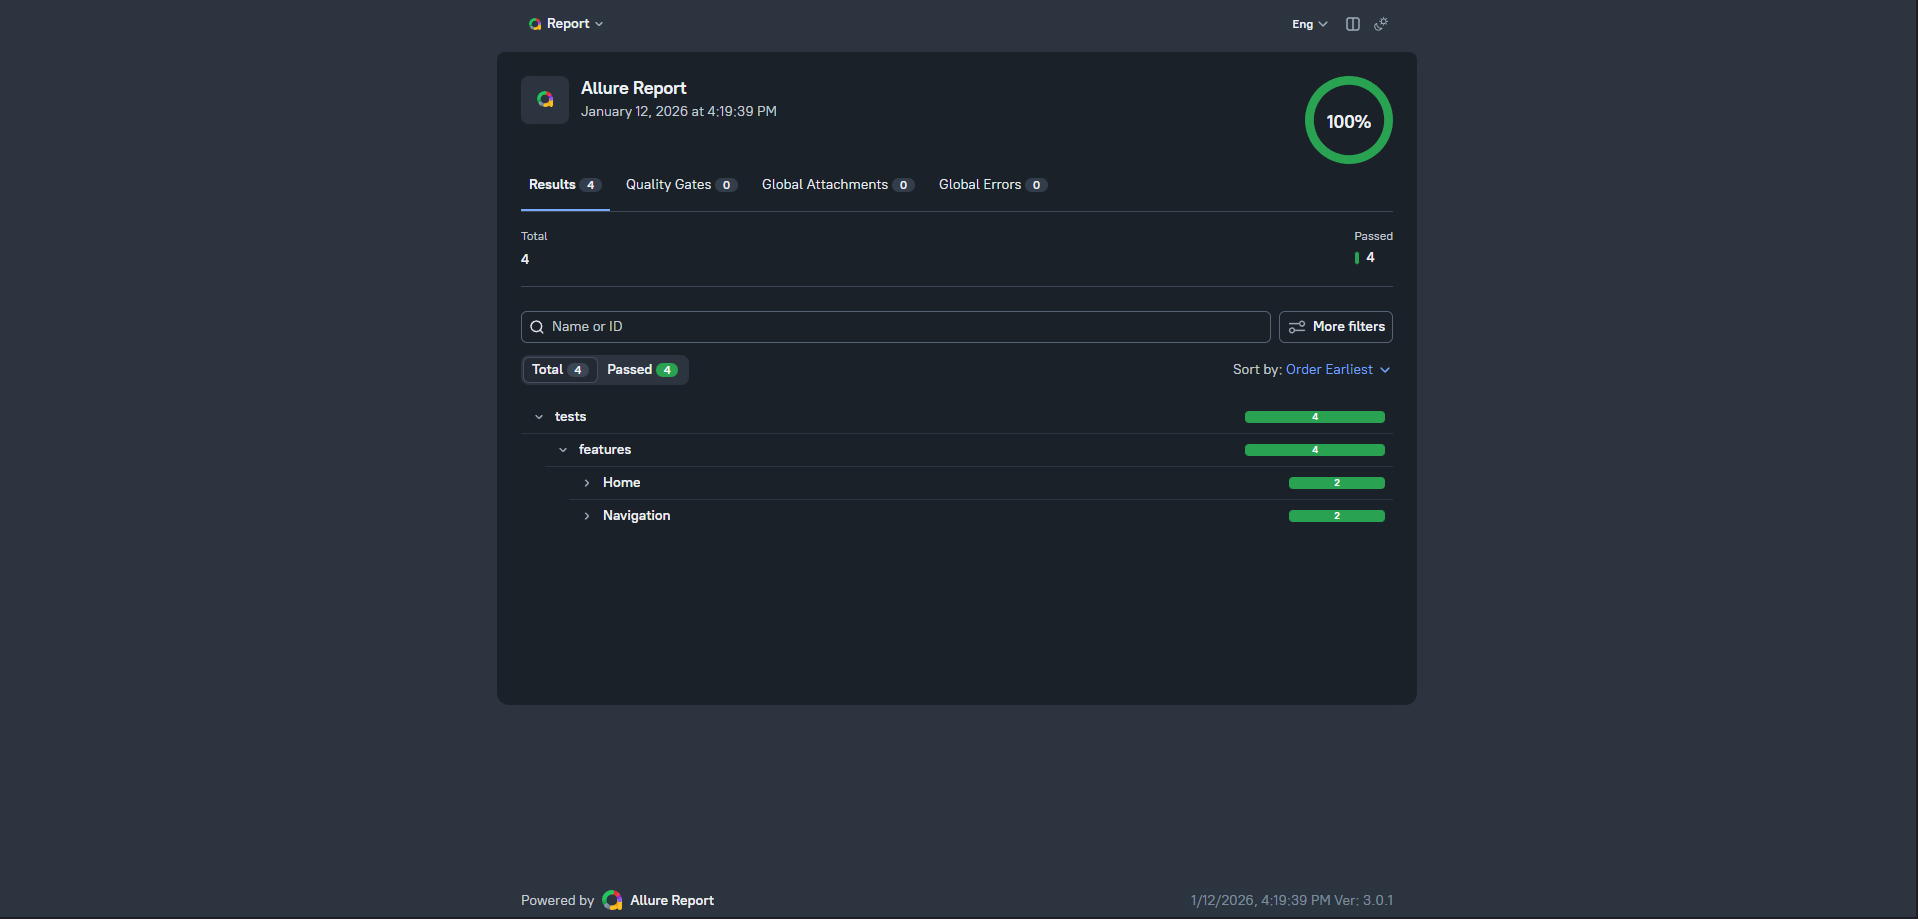
I have found cucumber-html-reporter and Allure to be the best looking reporting tools, however this repo is for setup with the former as I have more experience with it.
What makes them accessible is that they represent the results in charts, and present and organise your results into collapsable accordions for further investigation.
As a result the UI is very user friendly.
Option A: Installing cucumber-html-reporter
Install the Package
npm i --save-dev cucumber-html-reporterCopied!
You get to choose between 4 themes bootstrap, hierarchy, foundation, and simple.
You can see the preview of the four report themes on the npmjs page for this package.
I would stick with the bootstrap theme as its the most presentable of the four.
Set Up index.js File
Following the guide linked earlier, we now create the index.js file and put in the following:
var reporter = require('cucumber-html-reporter');

var options = {
        theme: 'bootstrap',
        jsonFile: 'report/cucumber-report.json',
        output: 'report/cucumber-report.html',
        reportSuiteAsScenarios: true,
        scenarioTimestamp: true,
        launchReport: true,
        metadata: {
            "Test Environment": "Local",
            "Browser": "Chrome",
            "Platform": "Windows 10",
            "Parallel": "Scenarios",
            "Executed": "Local"
        },
        failedSummaryReport: true,
    };

    reporter.generate(options);
Copied!
In my experience this file was kept in the support dir, so thats where I'll keep the index.js file in this project. Important to note as our report script in the package.json will need to know where it lives.
Also remember to match the jsonFile and output dir values to what you have set it to in your cucumber.json file if you have changed it.
Option B: Installing Allure
Follow installation steps here
Generate Report
Now run your tests and then once that is finished run:
npm run reportCopied!
FYI: Good A11y = Good Time
Sometimes we can't control the code quality of the site we're testing. Someone might want to reinvent the wheel and create a button that acts as a link or a link that acts a button, or they install a package that has a component that breaks accessibility rules. They deserve to go to jail (dev jail where they must code in an open plan office with people talking to them every 5 minutes, and no headphones allowed).
Unfortunately when this happens, it makes targetting the right elements or classes harder.
Playwright has come equipped with a handy tool that can save time and effort in these situations, or atleast narrow down the right element to target. Enter stage right: Playwright Codegen
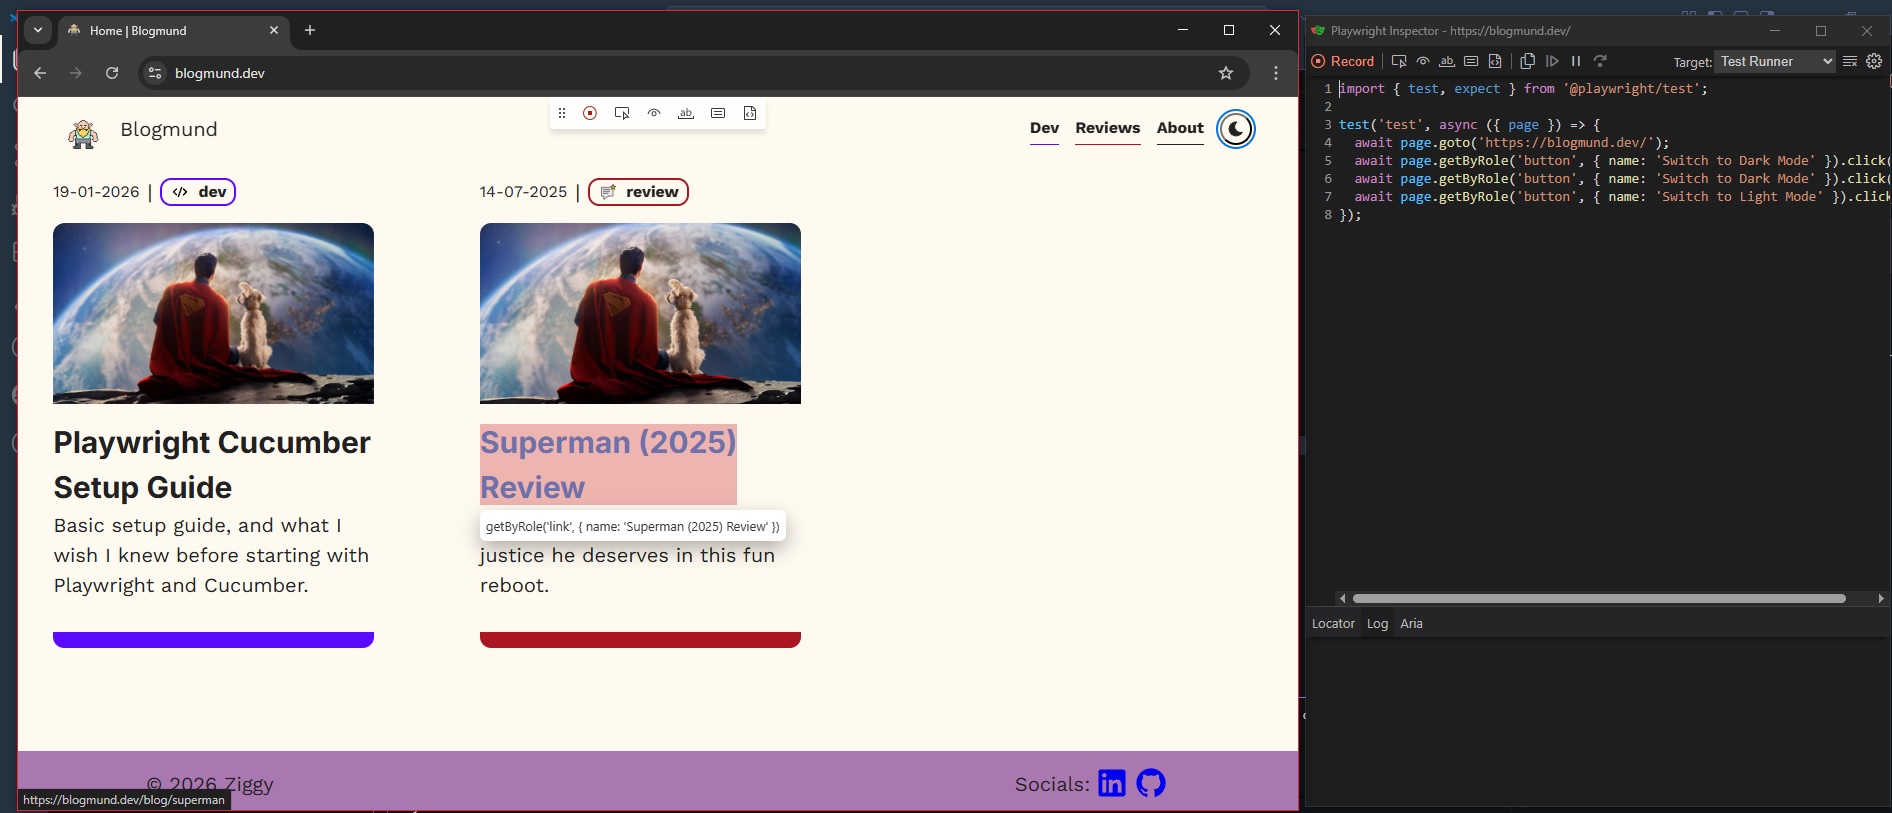
Codegen opens a chromium window with a blank insepctor. As you do actions on the browser: visitng urls, click things, the inspector records your actions. You can toggle from recording action to picking the locator which gives its best possible guess for a unique selector of the element you chose, or quick assert tests, however I would steer clear of these for more complex test steps. This way we can avoid brittle tests.
To run codegen:
npx playwright codegenCopied!
Exit stage left
References
- Playwright setup
- Playwright Codegen
- Playwright and Cucumber setup
- Cucumber Expressions
- cucumber-html-reporter npmjs page
- cucumber-html-reporter github page
- Allure Report
Extensions to Install
Cucumber (Gherkin) Full Support
Warning: This will not work with the Cucumber for Visual Studio Code extension. Just install this linked one only.